Purchases > Paying bills
Paying bills
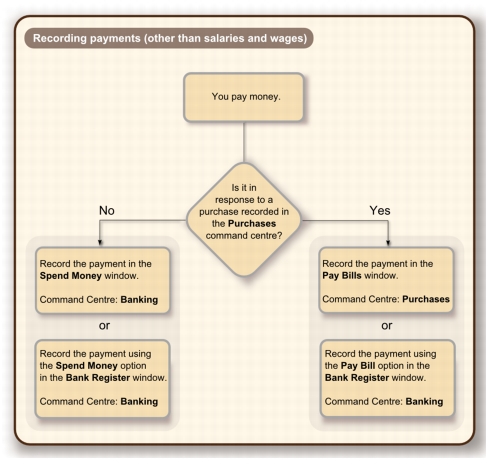
If you have recorded a purchase, you pay the supplier in the Pay Bills window. In this window you can record the payments to one or more of your outstanding bills.
You can also make payments to suppliers in the Bank Register window, especially if you have several purchases to pay and do not need to record detailed information for each payment. When you use the Bank Register window to make supplier payments, the entire payment is automatically allocated to the oldest purchase first. For more information, see Entering transactions in the Bank Register window.
You can pay several outstanding bills at once in the To Do List window.
If you pay your suppliers electronically—that is, by sending an electronic payment file to your bank for processing—you need to complete the electronic payment setup tasks (see Set up electronic payments).
The options for recording payments are summarised in the following diagram.
|
1
|
|
▪
|
If you are paying the supplier electronically—that is, if you will be generating an electronic payment file for this payment—select the Group with Electronic Payments option.
|
|
▪
|
If you are paying the supplier by some other means—such as by cash, cheque, credit card or Internet banking—type or select the account you are paying from in the Pay from Account field.
|
|
3
|
In the Supplier field, type or select the supplier’s name.
|
If you have outstanding supplier debits with this supplier, a message may appear. You will have the opportunity to settle the supplier debits immediately or at a later date. See Settling supplier debits.
|
4
|
In the Amount field, type the total amount paid.
|
|
6
|
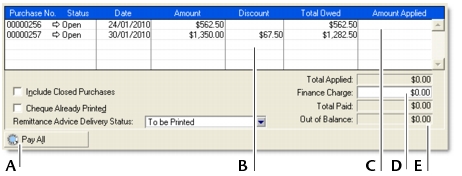
In the scrolling list in the bottom half of the window, indicate which purchases are covered by the payment by entering amounts in the Amount Applied column.
|
 |
||
|
Click Pay All if you are settling your account in full. The total payment amount appears in the Amount field and the individual payment amounts are applied to each open purchase.
|
||
|
If you are taking an early-payment discount for a purchase, assign the discount to the appropriate purchase in this column. Note that you cannot assign a discount to a purchase that you are not settling in full. If this is the case and you want to record a discount that the supplier has given you, you can create a supplier debit. See Settling supplier debits.
|
||
|
Amount Applied
|
The amount of the payment you want to apply to each purchase. The amounts you apply in this column are accumulated in the Total Applied field.
|
|
|
Finance Charge
|
If part of the payment was used to pay finance charges, type the finance charge amount here.
|
|
|
Out of Balance
|
The Out of Balance amount must be zero before you can record the transaction. This field will show an amount if there is any variance between the Total Paid amount and the Amount field in the top half of the window. If this happens, correct the amounts in the Amount Applied and Finance Charge fields.
|
|
|
7
|
If you are recording a cheque payment and the cheque has already been written, or if you are recording a transaction that doesn’t require a printed cheque (such as a petty-cash payment or Internet payment), select the Cheque Already Printed option.
|
|
8
|
If you want to send remittance advice in a batch, select an option from the Remittance Advice Delivery Status list.
|
After you have recorded a number of payments, say, the day’s payments, you can print or email remittance advices in a batch. For more information, see Forms.
|
9
|
If you want to preview the remittance advice or cheque for this transaction, click Print and then choose Preview Cheque or Preview Remittance Advice. Note that the transaction is recorded before it is displayed.
|
|
10
|
If you want to print a cheque or remittance advice now, click Print and select the form type you want to print. Note that the payment is recorded before it is printed.
|
|
11
|
Click Record.
|
Once you have recorded the bill payments you want to pay electronically, you can prepare the electronic payment file for your bank to process. For more information, see Electronic payments.
You can pay several outstanding bills at once in the To Do List window. The linked account for paying bills will be used for all supplier payments made from this window.
|
1
|
|
2
|
Click the A/P tab. A list of all unpaid purchases appears.
|
|
3
|
If you want to view details about a specific purchase, click the zoom arrow (
|
|
4
|
|
5
|
Click Pay Bills.
|
|
6
|
In the window that appears, enter a date for the selected transactions. This is the date that the transactions will be recorded in your accounts.
|
|
7
|