Inventory > Creating items
Creating items
Before you begin to track your inventory, you need to create a record for each item of the inventory. An item can be:
|
▪
|
a service that your company wants to include on item invoices, for example, ‘Shipping’ or ’Handling’.
|
When you create an item record, you can choose to buy, sell or inventory the item. These selections determine what functions you can use the item with. For example, if you want to include a service item on an invoice (such as installation), you need to specify that you sell the item.
An item that you inventory is an item whose quantities and values you want to track. Maintaining an accurate record of on-hand levels of these items requires you to do regular maintenance tasks. For example, you need to record inventory adjustments to write off damaged items or to record a stocktake.
|
Items or services you want to include on an item purchase order.
This includes items that are not for resale, and for which you don’t need to track quantities and values. For example, items for office use only.
It can also include raw materials you use as components to build other inventory items.
|
|
|
I Inventory this Item
|
Items you buy or sell and whose quantity and values you want to track.
It can also include intermediate goods used in the productions process, such as parts used to manufacture finished goods.
|
If you have existing on-hand quantities of inventory items, you need to record the opening inventory level for each item. For more information, see Enter your inventory opening balances.
|
1
|
|
2
|
|
3
|
The backslash character (\) serves a special purpose: any item number that begins with a backslash won’t appear on printed forms. This is useful for service-type items (such as labour) for which you don’t want to print an item number on the invoice.
|
4
|
In the Name field, type the name of the new item.
|
tip : Copy From
To copy another item’s information to this item record, click Copy From and choose the item whose information you want to copy from the list. All information for that item will be copied to the current item record except the item number, name, supplier number, auto-build information and history information.
|
5
|
Specify whether you buy, sell or inventory this item by selecting the relevant options.
|
As you select the options, fields appear next to them. These fields change according to the combination of selections you make.
|
6
|
Enter the appropriate accounts in the fields that appeared during the previous step.
|
|
Cost of Sales Account
|
Type or select the account you want to use to track the costs associated with producing this item.
|
|
Income Account for Tracking Sales
|
Type or select the account you want to use to record the income you receive from the sale of this item.
|
|
Asset Account for Item Stock
|
Type or select the account you want to use to record the total value of this item.
|
|
Expense Account for Tracking Costs
|
Type or select the account you want to use to record costs associated with purchasing this item.
|
|
7
|
If you want to check the spelling in the Name field, click Spell. For more information, see Spell-check.
|
|
8
|
 |
|||||
|
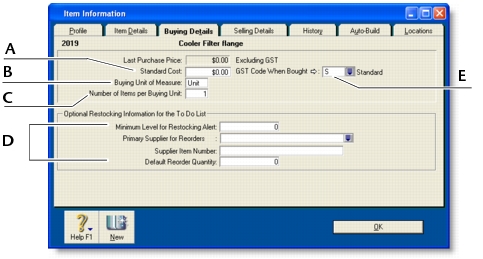
If you want to use the standard cost price as the default price, select Use Standard Cost as the Default Price on Purchase Orders and Bills preference in the Preferences window (Inventory tab).
|
|||||
|
Type the unit of measure (such as ‘each’ or ‘unit’) by which you purchase the item. The buying unit is printed on the purchase order. For example, if you buy eggs by the carton unit, when you order five units in a purchase you are ordering five cartons.
|
|||||
|
If you track on-hand quantities and values for this item, type the number of items that comprise a single buying unit. This is the number that is added to your on-hand inventory for every buying unit. For example, if you buy eggs by the carton unit but want to track their purchase individually, enter 12 as the number of items per buying unit. When you order one carton unit, your inventory item is updated by twelve items. If you leave this field blank, the value defaults to one.
|
|||||
|
|||||
|
Choose the GST code you want to use when you purchase this item. Note that you can override the GST code when you record the purchase.
|
|||||
|
9
|
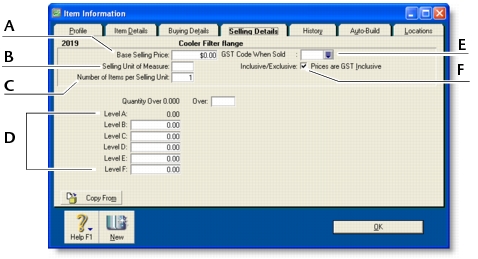
If you sell this item, click the Selling Details tab. The Selling Details view of the Item Information window appears.
|
 |
|
|
Type the selling unit of the item (such as ‘each’ or ‘unit’). You can type up to five characters. The selling unit is printed on the item invoice. If, for example, you sell by the six-pack, when you sell five units, you will be selling five six-packs.
|
|
|
If you track on-hand quantities and values for this item, type the number of items that comprise a single unit in this field. This is the number that is subtracted from your on-hand inventory for every selling unit. For example, if you sell by the six-pack, enter 6 as the number of items per selling unit. When you sell one six-pack, your inventory is reduced by six items.
|
|
|
Select the GST code you want to use when you sell this item. Note that you can override the GST code on invoices.
|
|
|
If you want to indicate that the prices on the Selling Details tab are GST inclusive, select the Prices are GST Inclusive option. If the prices are GST exclusive, deselect this option.
|
|
|
10
|
Click the Items Details tab and enter additional information about the item.
|
|
11
|
[AccountRight Enterprise only] If this item is stored in more than one location, click the Locations tab and specify the default location for buying and selling the item.
|
|
12
|
Click OK.
|