Sales > Creating a customer card
|
1
|
|
2
|
|
3
|
|
5
|
Type the customer name and press Tab. Additional fields appear.
|
|
6
|
Enter a code to identify this customer in the Card ID field. For more information, see Card identification codes.
|
If you want to enter more contact information, select Address 2 from the Locations list and enter the additional details. You can enter contact details for five locations.
|
8
|
Click the Card Details tab. You can enter notes about the customer, insert a picture and assign attributes to group and sort the card.
|
|
9
|
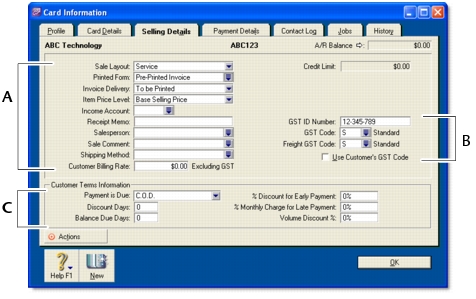
Click the Selling Details tab and enter your selling details.
|
|
Selling information
|
The selections you make here will be used, by default, on quotes, orders and invoices that you create for this customer. You can override these selections when recording the sale.
|
|
|
GST information
|
The customer’s GST information is entered here. If the customer’s GST status takes precedence over that of the item or service being sold, click the Use Customer’s GST Code preference. See Setting up GST codes.
|
|
|
The credit terms you entered earlier appear here by default. You can override them here for this customer. The credit terms entered here are used as the default terms for all sales to the customer, but can be changed at any time.
|
||
|
10
|
Click the Payment Details tab and select the method of payment your customer will use to pay you.
|
|
11
|
[Optional] Click the Jobs tab and create new codes for each job you have started or are about to start for the customer. For more information about jobs, see Jobs.
|
|
12
|
[Optional] Click the History tab and type the dollar value of the sales made prior to your conversion month. You can also type or select the date that the contact became a customer.
|
|
13
|


